


Do you have teacher desk envy? Don’t worry, you’re not alone.
I’ve already shared my office supply organizational method with you as well as my vertical to-do list.
But other than having my supplies organized and my list in a picture frame, my desk has never really been what I would call “cute.” Here’s an old picture below that is proof I have dealth with Drab Desk Syndrome, or DSS for short.

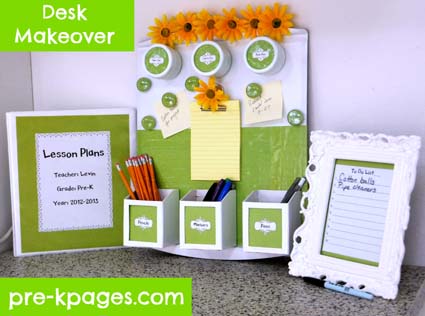
DIY Teacher Desk Makeover
Recently, I decided I just had to make some of those floral marble magnets that are the latest craze on Pinterest. I started with my magnets and planned my desk makeover from there. One of my goals was to go vertical so there would be less clutter on the desk.
This idea would also work if you don’t have a teacher desk and just use a counter or shelf area. I have included the materials list for you below as well as a tutorial.

Supplies
- Button Magnets {craft store}
- White Spray Paint {Wal-Mart}
- Cheap Cookie Sheet {Wal-Mart}
- Fake Flowers {Dollar Tree}
- Flat Floral Marbles {Dollar Tree}
- E6000 Glue {craft store or Wal-Mart}
- Scrapbook Paper {craft store}
- Scissors
- Mod Podge {craft store or Wal-Mart}
- Brush
- Magnetic Clip {on hand but I think you can find them at the teacher store}
- Command Strips {Wal-Mart}

Other Materials
I found the boxes for the pencils, markers, and pens in the Target Dollar Spot on clearance for thirty cents each. I also found the round magnetic containers for the paper clips and pins in the same place for the same price.

How to Make Floral Marble Magnets
I started with the marble magnets and followed the tutorial found here. The only thing I did differently was I used E6000 glue instead of a glue gun to attach the magnets to the back of the marbles because every teacher knows E6000 is the best. glue. ever.
After I finished the magnets I spray painted the cookie sheet, boxes, and round containers white- because I felt like it, not because it’s necessary. Here’s an important tip, don’t buy a non-stick cookie sheet! Nothing sticks well to a non-stick pan so cheaper is better in this case.
After the paint was dry I applied Mod Podge to the lower half of the cookie sheet with my brush and placed the scrapbook paper on top, smoothing it out as I went. As you can see in the picture below there are still some bubbles in the scrapbook paper so I need to work on perfecting my Mod Podge skills. When the Mod Podge was dry I applied a second layer on top of the paper.

Next, I attached magnets to the back of the boxes using my trusty E6000 glue. I also cut the tops off the fake flowers and glued those to my cookie sheet and magnetic clip with E6000. I intended to attach my cookie sheet to the wall using the Command Strips but they wouldn’t stick to my wall for some reason. I made the little labels on the boxes using clipart that I cut out and glued to the front of the boxes with Mod Podge.
Some of the supplies I already had on hand so all in I spent about $10 on this makeover. I hope you enjoyed this cute and inexpensive DIY makeover for your teacher desk!


