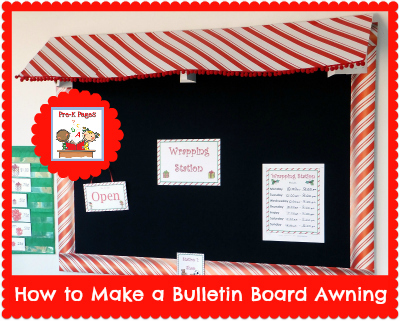


Today I’m going to show you how to make an awning for a bulletin board. The awning pictured above was featured in my new Holiday Dramatic Play Wrapping Station kit.

Bulletin Board Awning Tutorial
I received so many requests for the awning directions I created this easy, DIY tutorial for you. As I’ve mentioned before, I’m not much for written directions, I’m more of a hands-on, visual learner so you may need to tweak these directions for your own use.

Bulletin Board Awning Supplies
- Poster Board {I used 3 pieces, you may need more if your bulletin board is larger}
- Wrapping Paper {color of your choice}
- Scissors
- Elmers Craft Bond Spray Adhesive
- Ball Fringe {color of your choice}

Bulletin Board Awning Directions
Step 1:
First, I divided two pieces of poster board in half the long way and cut them apart. Then, I folded about 3 inches of the long side of each piece over. This fold will allow your awning to either slide behind the top of your bulletin board or you can staple it to the wall. Next, I used my spray adhesive to attach the two pieces of poster board together to create my awning. I recommend spreading out newspaper when using the spray adhesive so you don’t get it on your floor; I did it in my driveway.
Step 2:
After the awning was created I measured and cut my wrapping paper to size.
Step 3:
Then, I sprayed the top of the awning with spray adhesive and carefully smoothed the wrapping paper over the awning. I trimmed the edges of the paper where necessary. Finally, I sprayed a thin line of adhesive along the front edge of the awning and attached the ball fringe. I wasn’t sure if the ball fringe would stay on but I was really pleased with how well it turned out. I just pressed the fringe firmly along the edge and that was it.
Step 4:
I don’t have a picture of this part but it is the trickiest. First, I inserted the folded edge behind the top of my bulletin board. Then I measured the angle at which I wanted the awning to hang. I cut two of the corners off the third piece of poster board at that angle and I stapled them to the bulletin board and laid the awning across the top. I think this part needs some fine tuning because my awning isn’t perfectly straight, it sags a little bit. Any suggestions?
Bulletin Board Awning Costs
- Poster Board $3
- Wrapping Paper $3
- Ball Fringe $4
- Craft Bond Spray Adhesive {on hand}
The total cost of this project was $10.